Provide Accountant Access to Xero
Introduction
One of the most powerful features of Xero is its capability to facilitate seamless collaboration between small business owners and their accountants. Inviting your accountant to access your Xero subscription is a straightforward process, and this guide will walk you through the steps to do just that. By following these instructions, you can grant your accountant access to your Xero account, ensuring efficient and effective financial management.
Table of Content
- Accessing Your Organization Settings
- Inviting Your Accountant
- Configuring Accountant's Access
Steps
Accessing Your Organization Settings
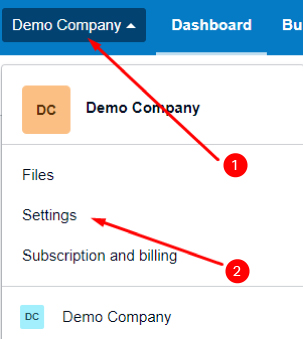
To begin, you'll need to navigate to your organization settings in Xero. Follow these steps:
- Click on your organization's name, located at the top left-hand corner of the Xero screen.
- Click on "Settings."
Inviting Your Accountant
Once you're in the organization settings, proceed to invite your accountant:
- Under the "General" heading, locate and click on "Users."
- Then, click on "Invite a user."
Configuring Accountant's Access
With the invitation stage reached, you will now configure your accountant's access to ensure they have the necessary permissions:
- Enter your accountant's details, including their First Name, Last Name, and Email.
- Under the "Give them access to" heading, ensure the following options are ticked:
- Payroll admin
- Business and accounting
- Next, click on "Adviser" and ensure that you tick all empty boxes to grant your accountant comprehensive access.

By following these simple steps, you'll successfully invite your accountant to collaborate on Xero, allowing for smoother financial management and collaboration between you and your accounting professional.
Need Further Support?
Contact us via email at admin@profit1st.com.au